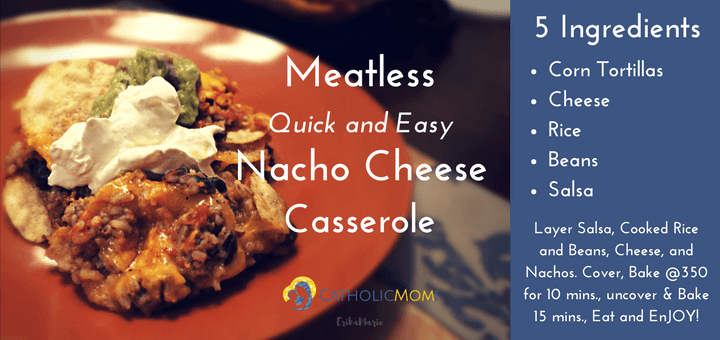
For my return from my Tasty Tuesday sabbatical, here’s the delicious Peppered Sausage & Basil Omelette I made for dinner the other night {and had for breakfast the next morning}.

Peppered Sausage Omelette

I’m not an expert cook by any means, I’m not even an amateur. So I can’t tell you exactly how  to make this, but I’ll tell you what I put in it and assume others are way more talented than me when it comes to knowing the right pan and temperature for the ‘perfect omelette’.  Or ask Martha – she knows everything about everything. It’s appropriate my mom shares her name.

Peppered Sausage Omelette Prep

Ingredients for mine:

I actually used 5-6 eggs for this {I love eggs and planned on making enough to have leftover} You can use less eggs for a thinner one-person serving

I sprinkled in some garlic and onion powder, basil, and salt and pepper to taste

chopped peppers

Sliced and diced sausage {I used a pre-cooked German sausage from the local butcher’s}

Shredded cheese {optional}

“Directions”:

1. Start heating pan and then add some oil in it. (maybe 1/2 TB?)

2. Crack eggs into a mixing bowl.

3. Add seasonings.

4. Gently whisk eggs with a fork {Try not to over mix}

5. Making sure oil is ready but not too hot, pour eggs into pan.

6. I let it sit there a little bit before adding the other ingredients. You don’t want the eggs to burn or start bubbling though.

7. After like 30 seconds or so, add in your chopped peppers and sausage {and cheese}.

8. I don’t shake the pan around or anything like Martha does, I just kind of let it cook a bit and then use my spatula to fold one side over the other, let it cook, then turn it and let it cook on that side, then flip again. I just keep flipping it back and forth a few times until it is cooked to my satisfaction - not too runny, not too dry. {It’s different every time I make it depending on who is yanking on my leg or screaming or if I start cleaning the dishes and forget what’s on the stove.}

9. Then I flip it onto a plate and immediately proceed to gobble it up. {Sometimes I’ll add some salsa or ketchup}

{Tip: I made this same omelette for my husband sans the peppers – it’s a texture thing for him}


Ohhh yeaaaahhhh, baby. That’s what I’m talkin’ ’bout. Go ahead, salivate.

I like big sandwiches and I cannot lie and…I can’t remember the rest of the song which is probably good because I’ve probably embarrassed you enough by now.

How do you like to load up your sandwich?
I like me some avocado (and that right there would be enough), cream cheese, cucumbers, tomatoes, layers of meat (or not), and swiss cheese, mmmmMMMMmmmHHHmmmmm. Yum.

Yup, I’m gonna go make that right. now. For dinner.


Here’s a nice-n-easy Lenten meal: Mango Tilapia Salad Rolls.

What you need:

Kroger frozen tilapia fillets

Mango (fresh, frozen, canned, whatever). You can also use canned mandarins or peaches (which is actually what I used in this picture)

Salt and Pepper

Tortillas

Salad (I got the pre-packaged Romaine lettuce with carrots and red onions)

Optional: Tomato chunks, avocado, etc.

Thaw fillets according to package directions. Then fry them in some oil in a skillet for about 5 – 10 minutes or so until cooked through and break them up as you cook them. Season with salt/pepper to taste. You can also add a wee bit of lemon juice if you’d like.

Scoop the cooked fillet pieces into a bowl. Add the Mango (or other fruit of your choice/availability)

Then you can make your rolls. I like to warm my tortilla up a bit and then lay down some salad first followed by the tilapia/fruit mix. Then, wrap your tortilla over it all and voilà. Eat and enjoy!

This is a very adjustable and easy recipe that even my ‘particular’ eaters like.


I love meals that are simple but totally rock. Like this one.

  • Ground Beef – seasoned to taste and with a can of black beans dumped in.
  • Corn Tortilla Chips
  • Shredded Cheese
  • Sour Cream
  • Salsa
  • Guac!

Set it all out and let everyone make their own “Nacho Salad”.

Not pictured and other options: Corn (cooked with beef or separate), shredded lettuce, chopped tomatoes, etc.

Best part about this meal – aside from it being simple and rocking – my family, including my husband, loved it! We ate it TWICe in one week! Woohoo!


I love Lasagna. I used to love it with cottage cheese filling but my husband didn’t care for it so I tried Ricotta cheese instead, which was better but still not something he was particularly fond of. I’ve made lasagna with ‘homemade Ricotta cheese’ but I could tell it was still a little much. So the other day I got to thinking about it and thought, “You know what? Who says Lasagna has to have any type of Ricotta/Cottage cheese filling?” Well I’m sure someone says so but I decided I wasn’t going to anymore. So I made a regular Lasagna without the thick che ese filling and it tasted great! I didn’t realize how much better Lasagna could be! Everyone loved it, especially my husband – mission accomplished!

For the above picture, this is what I did:

Ingredients used:

1 Box of Lasagna noodles

2 Jars of Marinara Sauce

1 1/2 bags of Italian blend cheese

about 1.5 pounds Breakfast (pork) sausage

Method:

1. Brown meat in large skillet, drain.

2. Put meat back into the skillet and add 1 jar of the Marinara sauce and let that simmer together. Add more sauce as desired to the meat sauce or reserve some to pour on top of the whole thing like I did. My husband likes extra sauce so by the end, I ended up using the whole 2 jars of sauce.

3. While meat is cooking, cook noodles according to package directions.  (Note: The first time I tried this, I did not pre-cook the noodles and I found them a bit too hard.)

4. Once you have everything cooked, it’s time to assemble like you usually would for lasagna except you will not put in any ricotta/cottage cheese. I did, however, sprinkle the Italian cheese blend over the top of the meat sauce on each layer.

5. I baked the above at 375◦ for 30 minutes covered with foil, then another 10 – 15 minutes without foil.

6. Serve, eat, and enjoy!


DSC05922-1

A few years ago, I shared a Rosemary Focaccia Bread Recipe from Betty Crocker’s Best Bread Machine Cookbook: The Goodness of Homemade Bread the Easy Way. It’s easy, quick, and wonderfully delicious. It’s been so popular amongst friends and family I’m sharing the recipe again with some updated pictures to showcase its amazing deliciousness. (And to make you drool)

This recipe is super simple and has many optional variations and uses. I thought it might be fun to make this a link-up post so others can share how they’ve used this base recipe and with your own adaptations. I’ll leave the link-up open so we can continue adding ways to use this awesome Focaccia bread.

There are so many ways to use Focaccia bread. We eat it plain, especially if my husband is around after it’s done baking. Or we save it for sandwiches or butter it as a nice accessory to a spaghetti dinner. I’ve used coconut oil instead of olive oil, or melted butter, too. I like to sprinkle it with shredded cheese or exchange the rosemary for other herbs. I’ve also used a little wheat bread instead of all white bread flour. It’s very versatile and makes for a great side to bring to family or social gatherings. But you might have to make a few batches as it gets eaten up very quickly!
DSC05880-1

The magic is in the dough. I use my Zojirushi Mini Breadmaker‘s “pasta dough” recipe for the dough part. Depending on the season, I watch it as it kneads and add flour or water/oil as needed so it’s not too sticky (too wet) or too crumbly (too much flour = dry and flaky)

BASE INGREDIENTS

  • ¾ cups water
  • 2 tbs olive/veg. oil
  • 2 cups bread flour
  • 1 tbs sugar
  • 1 tsp salt
  • 1 ½ tsp bread machine/quick active dry yeast
  • 3 tbs olive/veg. oil
  • 2-3 tbs chopped fresh rosemary leaves
  • Coarse salt, if desired

Measure carefully, placing all ingredients except 3 tbs oil, the rosemary and coarse salt in bread machine pan in the order recommended by the manufacturer. Select Dough/Manual cycle. Do not use delay cycles. Remove dough from pan, using lightly floured hands.  (I actually just turned it upside down onto the baking sheet)  Cover and let rise in warm place about 30 minutes or until almost double.

DSC05883-1

Heat oven to 400’ F.  Make depressions in dough at 1-inch intervals with fingertips.  Drizzle with 3 tbs oil. Sprinkle with rosemary and coarse salt.

DSC05911-1

Bake 15-18 minutes or until golden brown.  Serve warm, or cool on wire rack.  Success tip: Be sure to chop the rosemary leaves instead of leaving them whole. They can become dry quickly during baking, which makes them sharper and can be unsafe to swallow.  Do-Ahead Note:  After you have patted the dough into a circle on the cookie sheet, cover it with plastic wrap.  You can refrigerate it from 4 hours up to 48 hours.  Before baking, remove the dough from the fridge and remove plastic wrap.  Cover with kitchen towel and let rise in a warm place for about 2 hours or until it is almost double.  Then continue as the recipe tells you.

DSC05924-1


DSC05616-1

What do you get when you combine a recipe for carmelized bananas and a pear-apple-cranberry crisp recipe?

Drool over the above picture and find out.

Pardon me for a few moments while I gloat.

See that picture up there of perfect sugary fruity-crispy goodness? I made that. On my own, all by myself.

I was dreaming (again) about my friend Sarah’s crisp she shared and still feeling disappointed with how my variation turned out with that. I knew I had to fix it so I began experimenting with ideas in my head. At the same time, I was thinking about how I could use bananas in a different way and thought about carmelizing them. Thankfully I’m not the only one with such a crazy idea so I found recipes for carmelized bananas quickly and then had some fun playing around in the kitchen until I came up with something pretty.darn.delicious. (but maybe only about 5% healthy) I ‘accidentally’ put in too much sugar so it was a little on the sweet side (too bad….)

So here’s the final recipe I came up with. Feel free to use less sugar as needed! And if you try this, let me know what you think and how you think it could be improved as I think I’ll probably play around with this again.

Fruit I used:

2 very ripe Bananas

2 very ripe Pears

Carmelizing powers came from:

1/2 TB Butter

3 TB Brown Sugar

1/4 cup OJ (or use rum if you’re cool and have that kind of thing in your pantry)

1/8 tsp cinnamon

Crispy topping:

1 1/2 cups Flour (use whole wheat flour if you want to pretend like this is a ‘healthy’ dessert)

1/2 cup white sugar (this is where I ‘accidentally’ spilled too much and ended up with maybe 1 cup oops!)

1/2 cup brown sugar (and somehow I managed to ‘accidentally’ spill a bit more again! Gee whiz!)

1/2 tsp salt (good thing I didn’t spill this!)

1 tsp cinnamon

1 cup Barley flakes (you can use oats but they make my tummy hurt)

Finishing Touch:

1/2 to 1 cup of butter, melted. You’ll need enough to cover the top before baking.

Now, what to do with all this?

1. Skin and dice your pear and banana and then follow the directions for carmelizing them here.

2. Once that’s done, scoop that out into an 8×8 square lightly greased (buttered) baking pan.

3. Whisk the dry topping ingredients together in a bowl.

4. Pour that evenly over the carmelized fruit in the pan.

5. Lastly, cover it all with the melted butter. (Settle down – haven’t you heard that butter is good for you?!) This step is important I only put diced butter over the top at first. But the flour and topping wouldn’t bake and we didn’t want to eat loose unbaked flour. So I thought, hmmm, what can I do to make it bake? I think the baking angels must have whispered in my ear because somehow I thought, “Hey what if I pour melted butter over the top?” And it worked! So be sure to do this for that nice golden and crisp topping.

6. Bake @ 350 F. I’d say start with 30 minutes and then check it to see if the top looks ‘golden’ enough. If not, bake it a bit longer but watch that you don’t burn it!

I really liked this carmelizing business. I’ve been dreaming up other ways I could use that. I might try adding in raisins and/or cranberries next time. Or maybe I’ll try a carmelized fruit cheesecake next…


My what a day, I’ve never had 2 kids down with a tummy bug and an infant to deal with all at the same time. (I’m eternally thankful for my husband) You’d think after all the ick I’ve seen and had to clean up in the past 24+ hours I’d never want to see food again; yet, that’s exactly what I wanted – comfort food. I’ve been dreaming of this Pear, Apple and Cranberry Crisp since my friend, Sarah, shared it the other day. I didn’t have all the ingredients but I did have some pears and plums that needed attention before they ended up feeding the compost box. I didn’t have a lot of the other ingredients and ended up changing the recipe so much it basically became a new recipe I’ll share below. One day I’d like to try the original recipe without any variations as I’m sure it would have been much tastier than my concoction, though mine still satisfied the need for a healthy snack with some sweetness sprinkled in.

Fruit Ingredients I used:

2 Pears (peeled, cut into chunks)

1 Plum (cut into chunks)

2 Apples (peeled, cored, sliced and chunked)

as I write this I realize I forgot to put in my raisins, darn. You could try that.

Since I didn’t have any of the juices or zests I improvised with some lemon peel I found in my spice cabinet (and used too much of by accident) and some apple cider vineagar. (That stuff is so tricky–always makes me think things will turn out tasting like apple cider…uh, nope.)

Oh but I did add in some mandarin orange juice from a small can. (that’s close enough to OJ, right?)

This is what I did for the Topping:

1 1/2 cups white whole wheat flour

About 1/2 cup of white sugar (I was going to use xylitol but thought better of it since everyone’s digestive track is already on hyperdrive at the moment - no need to add to that anymore)

About 1/2 cup of lightly packed brown sugar

1/2 tsp salt

1 cup barley flakes

1 TB flax seed mill

1 tsp cinnamon (you can use nutmeg with/or but I don’t care for it as much so didn’t use it)

1/2 pound (2 sticks) cold unsalted butter, diced.

Directions:

Preheat your oven to 350

Get all your fruit peeled and chopped up (as above) and mix it all together with the juice (and lemon peel and vinegar if you want to use that but I wouldn’t recommend it). Put this into your lightly buttered/greased baking dish. (whatever size you want depending on how thick/thin you want it and how much fruit you had available)

Then mix all your dry ingredients together in an electric mixer for about 2-3 minutes if you want it crumbly or, if you want it more ‘doughy’ or you simply forget to turn it off after 2 – 3 minutes, just mix it longer but not too long or you may as well make some cookies or ‘granola’ balls out of it (which isn’t a bad idea…) Once it’s mixed to your liking, sprinkle it over the fruit, stick it in the oven and bake it for about 30 minutes (until the topping is slightly browned [not burned] and the juices bubble). (I also sprinkled on some more white sugar before baking, shhhhh!)

Voila, I’d definitely nix the lemon peel and apple cider vinegar on the next go around but all in all it was good. The best part was enjoying it outside in the warm sun with my 6-year-old and baby, it was a welcome break from the other two whiney needy poor innocent sickies, (pray they feel better tonight for all our sake’s!)


My mom made this delicious Lasagna for our daughter’s 1st Communion celebration and I’m finally getting around to sharing it. I call this an ”authentic” Italian lasagna since her sister, who lives in Italy, helped her with the recipe and guided her over the phone while she made it. My mom’s not Italian but sometimes she may as well be since making Italian food is most definitely her forte!

I love lasagna but don’t make it as often as I should because I get lazy, it helps to break the steps up throughout the day or in a 2 day period. You could cook the meat one day, make the sauce another, and then assemble and bake it. It also freezes well before baking.

The recipe my mom used is a bit more involved, since it’s “authentic”, but the results are well worth the extra work. You can see her Lasagne alla Bolognese recipe here.

What’s your favorite lasagna recipe? (I usually just follow the one on the back of the box)


Is it 4 o’clock or even 5 and you’re in the mood for homemade pizza but forgot to make the dough earlier? When this happens to me I either grudgingly find something else that’s quick and easy to make or end up ordering out. But the other day I found this Homemade Pizza “in less Than 30 minutes” recipe . I’ve made this twice and it’s turned out great everytime; it’s become a real dinner (and life) saver! One secret: I put all the ingredients into my trusty Zojirushi Mini Breadmaker and let it mix and knead in there for 2 8-minute dough cycles but if you’re used to making dough with a hand mixer I’m sure this would work out well also.

*Update: One more thing: The dough makes enough for 2 pizzas so divide it into 2 balls balls before spreading it out. Then you can either bake 2 and eat now or save for later, or you can put one in the fridge or freezer for later.

I’ve experimented with different toppings. Above is the classic spaghetti (pizza) sauce with ground beef and cheese. The other day I used some leftover chicken marinara sauce with mozzarella cheese and didn’t make enough–my husband was very pleased and that made me very happy of course. Tonight I might season the beef mexican style and see how that turns out.

So next time you’re in the mood for pizza but think it’s too late to start, try this!

Related Posts with Thumbnails